Render Lighting
Initial Notes:
The tutorials in this section are made using VRay 5.26 (issued 4/22) for Rhino. While the concepts reviewed in the tutorials may be applied to other render software or older versions of VRay, some of the tools that provide shortcuts in this tutorial may not have an equivalent.
When possible, render with the RTX render engine for speedier renders. This requires a PC with an NVidia RTX graphics card. All other computers should render with the CPU setting.
Keep render output resolution to a proportionally small number (suggested max 800 dpi), then increase resolution at final render.
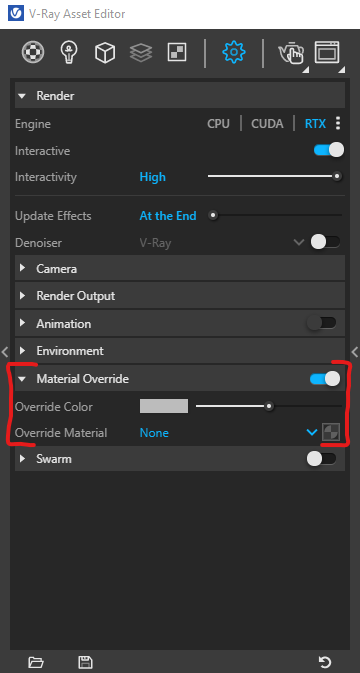
It is recommended to switch on “Material Override” in the VRay Asset Editor>Settings. This will limit the excess time required to render more complex materials while you are making micro adjustments to lighting.
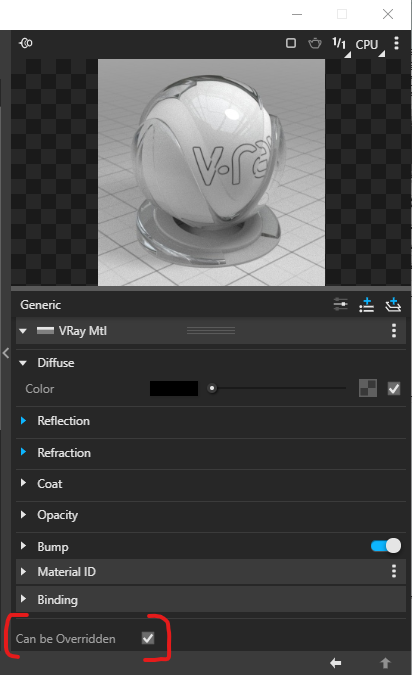
In the case of transparent or highly reflective materials that will contribute significantly to lighting, you will need to Uncheck the “Can be Overridden” box in the materials options.
Unswitch “Material Override” at time of final render.
The tutorials in this section are made using VRay 5.26 (issued 4/22) for Rhino. While the concepts reviewed in the tutorials may be applied to other render software or older versions of VRay, some of the tools that provide shortcuts in this tutorial may not have an equivalent.
When possible, render with the RTX render engine for speedier renders. This requires a PC with an NVidia RTX graphics card. All other computers should render with the CPU setting.
Keep render output resolution to a proportionally small number (suggested max 800 dpi), then increase resolution at final render.
It is recommended to switch on “Material Override” in the VRay Asset Editor>Settings. This will limit the excess time required to render more complex materials while you are making micro adjustments to lighting.
In the case of transparent or highly reflective materials that will contribute significantly to lighting, you will need to Uncheck the “Can be Overridden” box in the materials options.
Unswitch “Material Override” at time of final render.
01 Directional Lighting
This technique of render lighting best approximates the measured and projected methods used in the École des Beaux-Arts studies common in the 19th century.
This method begins with a single, primary directional (parallel) light is positioned at 45° in plan and 45° in elevation from the plane of the orthagonal or near orthagonal (lens lenght >200mm) camera. Shadows should be sharp and clear, but balanced with the environmental lighting so as to not completely darken the shadowed areas. The lighting angle may be adjusted from the initial set up.
Key Tools:
VRay Directional Light
Settings>Environment>Background
Settings>Camera>Exposure Value (EV)

02 HDRi Lighting
This technique uses the light value and color palette sourced from images to light a scene. True HDRi images are a specific .hdr or .exr file format and are 16 or 32 bit color. This ensures the most depth, resolution, and color range sourced from the image. Regular 8bit jpeg and png images may also be used, but provides a more limited depth to the rendered image.
Distinct from the directional lighting method, working with HDRi’s places a greater emphasis on context (if constructed) to tone and produce the atmosphere of the rendered scene. HDRi’s work particularly well for reflective materials that reflect the light, color, and shape of things outside of the view of the camera.
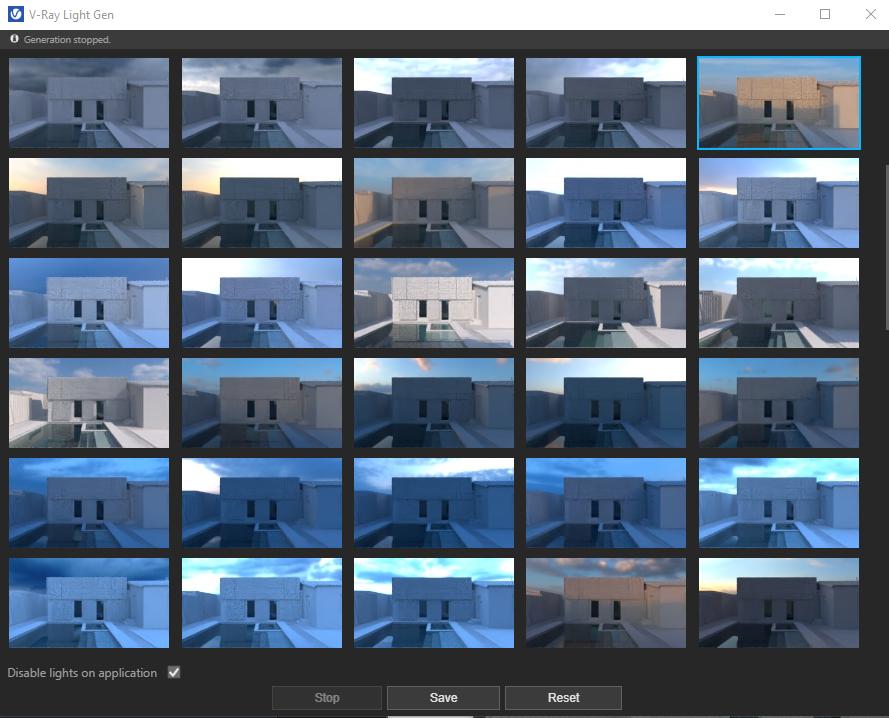
VRay provides tools to auto-generate HDRi’s for a scene or import your own.
Key Tools:
Dome Light
Light Gen
Distinct from the directional lighting method, working with HDRi’s places a greater emphasis on context (if constructed) to tone and produce the atmosphere of the rendered scene. HDRi’s work particularly well for reflective materials that reflect the light, color, and shape of things outside of the view of the camera.
VRay provides tools to auto-generate HDRi’s for a scene or import your own.
Key Tools:
Dome Light
Light Gen
03 Light Mix
In addition to the HDRi and or Directional/Sun lighting that light a scene from off camera, lights placed in the scene contribute to the overall tone and depth of a scene. Vray offers several different light times from spot and rectangular lights that direct light in specifc angles to Mesh lights that convert objects in to glowing lightbulbs. These lights, in addition to the Light Mix Render Layer enable a broad range of controls in your scene.
Key Tools:
Spot Light
Rectangular Light
Mesh Light
Light Mix Render Layer
Key Tools:
Spot Light
Rectangular Light
Mesh Light
Light Mix Render Layer
04 Interior Lighting
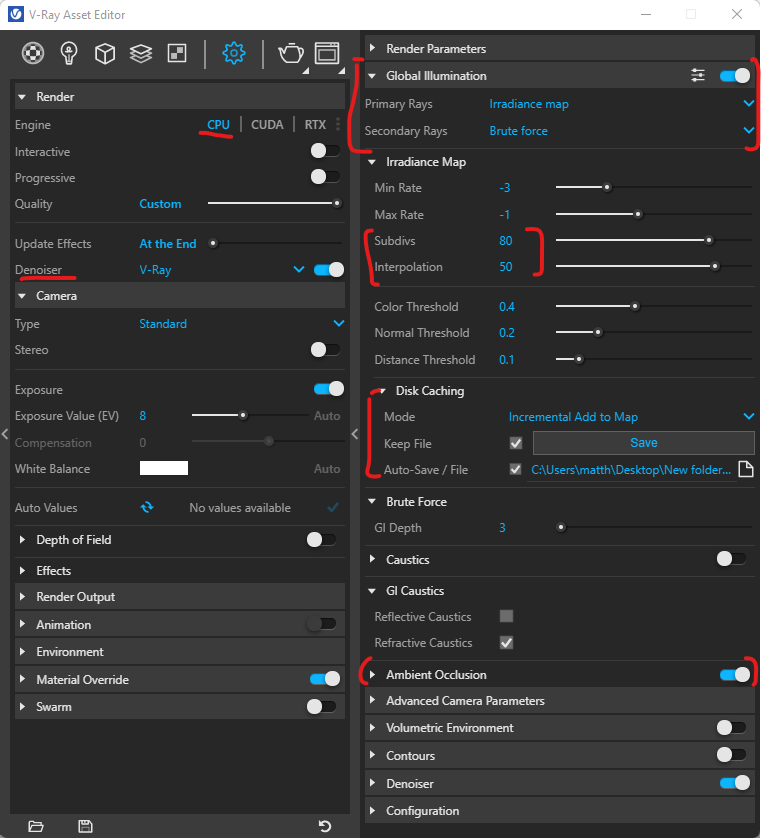
Interior lighting requires some additional settings to render bright and clear:
1. Render with the CPU Engine, non-interactive, and bucket-mode (Progressive Off)
2. Check ON Denoiser
3. Under Global Illumination, set Primary Rays to Irradiance map and Secondary Rays to Brute Force.
4. Under Irradiance Map, set Subdivs to 80 and Interpolation to 50
5. Set a Save location for Disc Caching, this saves some lighting data on complete passes.
Additional Notes:
- Add a rectangular light pointed inward at all window openings. Set Light to Intensity 1 and Directionality to 30
- Use Light Gen to generate light paths and background. Under Sun in VRay Lighting tab, set the Sky to Hosek.
-Set the Recangular window color to Sky settings